

Master the Magic: Your Guide to Gemini’s Mini Photo Editing Tools
We’ve all been there: you capture or generate a stunning image, but one tiny detail holds it back from being absolutely perfect. Maybe an accidental bystander ruined your shot, the background feels too cluttered, or you wish you could completely swap out the setting while keeping the main subject intact.
You don’t need to open complex desktop software to fix these issues anymore. Right here inside Gemini, you have access to a powerful suite of mini photo editing tools designed to handle local edits, blends, and text fixes in seconds.
Here is how you can use these quick-editing features to elevate your digital designs.
1. Seamless Local Edits and Background Swaps
The most impactful tool in this mini-toolkit is the ability to make targeted local edits. If you want to change an object in your photo—like changing a casual shirt into a sharp suit or replacing a plain background with a dramatic “golden-hour” skyline—you can simply guide the AI directly. You can draw over the specific area you want to modify and describe the change. The AI seamlessly blends the new elements with the original lighting, shadows, and textures.
2. Character Consistency and Image Blending
Have you ever wanted to combine elements from two different photos? Gemini allows you to blend multiple uploaded images into an entirely new scene. The real magic here is character consistency. If you feed the AI a reference face or subject, it can recreate that exact subject in a brand new environment with incredible precision. Your original facial features and expressions remain intact, making it perfect for creative portraits or digital avatars.
3. Fixing Text and Typographical Errors
One of the historical hurdles of AI image generation has been spelling. If your generated graphic or poster has a misspelled word, you don’t have to scrap the whole project. You can use the local editing feature to target the broken text and prompt the correct spelling. The system will cleanly render the new typography, matching the font style and perspective of the rest of the image.
Quick Tips for Best Results
- Be Specific with Lighting: When altering an image, mention the lighting style you want (e.g., “cinematic lighting,” “soft studio light”) to help the edit blend naturally.
- Keep Core Features Unchanged: If you are editing a personal portrait, explicitly instruct the AI to leave the main facial features original while changing elements like clothing or the background.
- Isolate Your Changes: When using brush or drawing tools to guide an edit, keep your selections tight around the object you want to change to preserve the rest of your high-definition details.
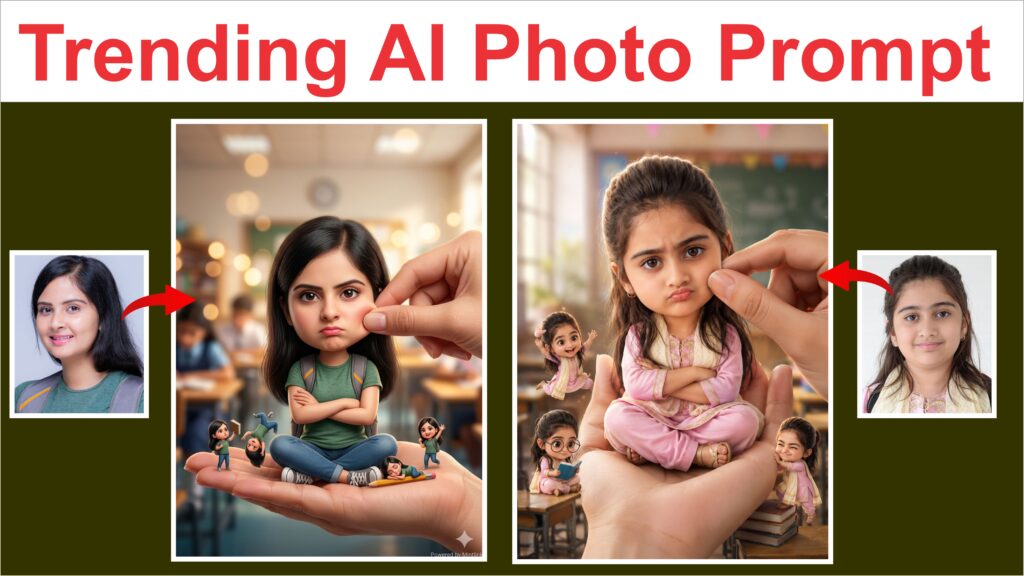
Create a stylized big-head miniature portrait of her. She appears as a tiny character with a slightly enlarged head and small body, sitting inside a large women hand. Pose: seated cross- legged, hands crossed, slightly pouty, angry but very cute expression. looking at the camera. Environment:
blurred school classroom background with bokeh.
Add a second hand gently pinching/ adjusting the person’s cheek for a playful effect. Also add some 3d mini chibi characters of her around, doing funny stuffs. Outfit: same as her
22
reference image. Lighting: soft cinematic light, shallow depth of field high detail, ultra-realistic, clean focus Powered by Mintlink size 5×7 ratio